| Wyvern Semiconductors | Expert in Digital IP Solutions |
|
Reference Manual

abstract A C/C++ instruction set simulator model of the RISC-V soft CPU core is presented. The model implements the RV32G specifications, but is architected to be extensible for other extension specifications, as well as to be customisable. The model is configurable to include a mix of extensions to match need, and uses a class heirarchy to achieve this. The source code is iavailable on github, and released under GPL v3.0. The internal architecture is also described to allow ease of extensibility by third parties, and for informative purposes. THe development setup is also detailed, along with the procedure for obtaining and running the riscv-tests.
Contents
IntroductionThe document details the design and use of an open-source RISC-V instructions set simulator, rvs32_cpu. It is meant as an exercise in modelling a modern RISC based processor with the aim to demonstrate the operations of such a device, without the complexities of a hardware implementation. The code itself is also designed to be accessible and expandable, as an education tool and a starting point for customisation. As such, this document, as well as usage information, will give some details of the internal design of the source code sufficient to navigate and modify the code, as desired. At this time it's fixed at implementing the RV32 features, with RV64 being a possible future expansion.
The model trades off between performance and clarity. It was designed to be an efficient model running at many Mips on a modern typical performance machine, but where clarity of operation would be unnecessarily obfuscated, a more practical route is taken. In addition, the use of third party libraries (e.g. boost) is avoided, as is some more esoteric features of the latest C++ language specification. Even use of the STL is kept to a minimum. It is aimed to be supported for compilation on both windows and Linux platforms, and support for Visual Studio and Eclipse is provided. The model can be used without the need to understand the code, but if one desires to delve deeper, and make modifications, then the intent is that the code is as easy to understand as possible, consistent with implementing the desired features. A 32 bit RISC ISS for the Lattice Mico32 soft core processor is already published [3], and this implementation borrows much from this, whilst extending and improving on some of the ideas in that architecture.
The project is a prelude to an open source soft core logic implementation targeted at FPGA. This, too, will be aimed at an educational and accessible implementation, rather than a high performance, low footprint and low power solution, whilst still implementing useful embedded soft core processor.
Basic FeaturesThe current model has the following basic features:
Class structureThe ISS is written in C++ and is structured around a base class that implements the RISC-V RV32I specification [1]. This base class can be expanded with ever succeeding derived classes to add the features to the RISC-V expansion specifications, allowing an arbitrary mix of feature sets.
The idea is to implement the minimal RISC-V 32 bit feature set (RV32I) in this base class, with enough hooks to allow a derived class to add additional feature sets that match the expansion specifications (e.g. M, Zcsr, F etc.), each with its own derived class that inherits the features from the previously implemented classes to make up a valid RISC-V implementation model. The diagram below summarises this intended structure, indicating what has been implemented, what is planned and possible future expansions
The diagram shows, in green, the currently implemented classes. The rv32i_cpu class is the base class implementing the RV32I specification. In addition it also has the Zifenci features implied, as the single HART implementation and the nature of the ISS operation means all FENCE instructions are nops. Synchronous traps are also implemented in the base class, such as misaligned addresses or system calls. A basic memory model is includes in the base class, but an external memory access callback feature allows for expansion to a more complex model by attaching an external memory software model. For instance, the memory model used in a PCI express root complex model, giving a full 64 bit memory availability ([4] Chapter Internal Memory Structure).The extension classes for RV32M, RV32A, RV32F and RV32D are also included, bringing the model up to RV32G standards.
Also included is a derived class, rv32_csr, which implements the CSR instructions and manages the CSR register updates. The actual CSR address space is modelled in the base class, but is not accessible externally. This will make it easier to add more expanded features that update and use the CSR registers that are not currently implemented. The expansion class uses the, now visible, CSR features to then implement the asynchronous interrupt features of external interrupts, timer interrupt and software interrupt. External interrupts become available by a callback feature which allows external code to set interrupts status, and the possibility of attaching a model of a debug module
As yet unimplemented classes are planned to implement M, A, F and D expansion features, bringing the model to the RV32G standard. The diagram shows a possible progression of inheritance from the CSR class in a linear sequence. However, these do not have to be added in that order, and features might be skipped. The diagram shows a route where the atomic operations are skipped, giving an RV32MFD,Zcsr,Zfencei implementation. The architecture is expecting a linear inheritance progression though, with the final derived class being that which the top level class inherits.
A top level class, rv32_cpu, is always the object instantiated by external code. The chain of expansion classes is inherited by this top class, wherever it terminates, with the top level inheriting the final derived class in the chain. This allows the models specification to be changed without altering any instantiations of the model in external code. It is also expected that in this class any custom features required to be added should be implemented.
The other features being considered, but not yet planned, are shown in the diagram. These include compressed code (RV32C), User and Supervisor privilege levels, and RV64x features. As much as possible, these features are considered in the current models design, but may require some refactoring to allow expansion whilst maintaining the class expansion hierarchy.
APIThis section describes the application programming interface for the model. Different parts of the API are defined in the different classes, and these will be detailed here, along with any methods overridden by higher classes
Base ClassThe following table is a list of the API methods available from the base class:
The aim, as much as is possible, is to be able to run a program with as little configuration as is possible. To work out of the box, as it were. To this end the constructor has only one argumenta file pointer for redirecting debug data to a file. This defaults to stdout, and so need not be given.
To load a program, the run method needs just the filename of a valid RISC-V ELF executable. By default, this will be loaded into the internal memory of the model. If a memory callback function has been registered, the callback will still be executed to give the function a chance to process this data. It is passed in with a type of MEM_WR_ACCESS_INSTR so can be treated differently from a normal write if required. The callback may chose not to process it, and the data will then be processed internally.
Direct access to memory is provided by read_mem and write_mem methods. Access via these methods will also be passed to any registered memory callback function, but with the passed in type. The CPU can also be reset with the reset_cpu method, which sets the PC to a fixed vector of RV32I_RESET_VECTOR. Calling this method is equivalent to the reset pin and does not initialise the models internal state not involved with the CPU itself, such as the disassemble active state. This kind of state is initialised at construction.
External Memory CallbackTo register an external memory access callback function the register_ext_mem_callback method is called, passing in a pointer to a function of type p_rv32i_memcallback_t. The is a function whose prototype is:
int func (const uint32_t byte_addr,
When registered, the function will be called whenever an access to the memory address space is made. The access byte address is passed in, along with a reference to a data word, and a and access type. In addition a time is passed in (the cycle count since reset). If a write access, then the data argument will contain the data to be written. If a read type, then the data should be updated with the read value. On return, the callback is expected to return either a count (in cycles) that it modelled the access to take (which can be 0), or RV32I_EXT_MEM_NOT_PROCESSED, to indicate that the access did not match an address space it was modelling, or that that was some other fault with the access. The time argument can be used for calculating any wait states for the returned access. When the callback indicates it did not process the access, the then model will attempt to process it.
Modelling memory is not the only use of the external memory callback, but as a gateway to the entire memory space of a larger system model in which the processor model resides. Models of registers in peripherals (e.g. a UART) can all be mapped via the callback, for instance, thus extending the processor model arbitrarily.
Running a programThe run method is used to execute a program (loaded with read_elf). It requires a configuration structure to be passed in of type rv32i_cf_s. As stated before, in order to work out of the box, a variable of this type can be constructed and passed in without modification, and the default settings will be used. The structure is defined as follows:
struct rv32i_cfg_s { const char* exec_fname; unsigned num_instr; bool rt_dis; bool dis_en; bool hlt_on_inst_err; bool en_brk_on_addr; uint32_t brk_addr; FILE* dbg_fp };
The name of an executable file to be loaded is given in exec_fname. This would normally be used by the read_elf method, but is made available to the run method for debug purposes. The default value is test.exe. The start address, from where execution will begin, is configured in start_addr, and defaults to 0.
Disassembly output is controlled with two flags. Normal, linear, disassembly is controlled with dis_en. When true, the model will simply run linearly from the start address to the end, disassembling the code. It defaults to false. The rt_dis flag controls run-time disassembly. When true the model will execute the program as normal, but output disassembled instructions as it goes. It defaults to false, and is also overridden by dis_en being true. An example output fragment is shown below.
A couple of controls are provided to halt execution on certain conditions. The halt_on_instr_err, when true, flag will break execution and return from run if a reserved or unimplemented instruction is executed (the default is false). The en_brk_on_addr flag, when true, will break execution when the PC reaches the address specified in brk_addr (default false).
The dbg_fp is a pointer of type FILE*. By default this is stdout, but can be set to a valid file pointer thats been opened for writing. This will redirect any debug information (e.g. disassembled output) to the specified file. This would normally be used by the rv32i_cpu constructor.
Zicsr ClassThe class implementing the Zicsr extensions (rv32csr_cpu) extends the API with a single additional method.
void register_int_callback (p_rv32i_intcallback_t callback_func)
This is used to register a callback for allowing external interrupts to be generated. If no callback is registered, then no external interrupts are possible. If a function is to be registered it must have the type p_rv32i_intcallback_t. That is it must have a prototype of:
uint32_t func (const rv32i_time_t time, rv32i_time_t *wakeup_time);
The callback function has a time (in cycle counts) passed in, and a pointer to a wakeup time for returning a scheduled time for the next call to the function. This can be 0 for calling every cycle. If wishing to add a delay, then the passed in time (the current time) is used plus any delay required until the next execution. The function returns the interrupt state. This is either 0 if no interrupt being generated, or a non-zero value for interrupt active. The RISC-V has a single external interrupt input, and uses external interrupt controllers to arbitrate between multiple interrupts. The interrupt callback function feature allows the model to be extended to add models of such controllers to be added.
Internal ArchitectureThe internal architecture of the ISS follows a conventional pattern. Within the run method (the entry point from external code) it will loop performing a fetch decode and execute stage, using internal methods fetch_instruction, primary_decode and execute respectively. What is, perhaps, less conventional is that the decoding to the functionality modelling the instructions is done by indexing into a set of tables that (ultimately) lead to a pointer to a function (a method of the class) which is then called with decoded information. Whether this is a better solution than a more traditional switch statement is open to debate, but the code, I believe, is less verbose and more understandable, with decoding a simple indexing into tables, and execution doing the same things for every instructioni.e. calling the function using the pointer recovered. This method was successfully deployed in the lm32_cpu instruction set simulator [3].
Base ClassThe base class (rv32i_cpu) contains all of the fetch, decode and execution code. In addition it has individual methods for each of the RV32I instructions to perform the function of these instructions. It contains the CPU state in a single state structure (rv32i_state class), which contains a single hart (indexed by curr_hart member variable) expandable to multiple harts, and a 4096 entry CSR table, along with the current privilege levelthough this is always at machine privilege for this class.
The hart member of state, itself, is a class of type rv32i_hart_state, which contains an array of words for the register file (x) and the program counter (pc).
Even though the CSR and privilege level state is not used in the base class, since CSR instructions not supported and only machine level privilege, by defining the entire state here, adding save and restore functionality becomes that much easier in the future, and expansion classes need only manipulate the base class state, and not add to it, which would make arbitrary expansion inclusion more complicated in dependencies.
Instruction FetchThe base class has a virtual method, fetch_instruction, which simply uses an internal method (read_mem) to read a 32 bit word from memory. Although this is a single line method, it is encapsulated as a virtual method to allow it to be overridden by a child class. In particular, if wanting to add support for compressed instructions (RV32C), the method can be replaced to handle the mix of 16 bit and 32 bit instruction fetches.
A companion virtual method is the increment_pc method which, in the base class, simply in increments the PC by 4. Again, for RV32C support, this may be overridden to manage the PC increments depending on the instruction type. The read_mem method checks for alignment and access faults, and this, too, is a virtual function that can be upgraded to check alignments errors for 16 bit instruction accesses.
DecodeDecoding is done with the primary_decode method and a set of tables to return a pointer to a function, which is the method to implement the instruction.
The first part of decoding is extracting the sub-fields of the instruction. The philosophy taken here is to decode all possible fields of the instruction upfront, populating a rv32i_decode_t structure, a reference of which is passed into primary_decode(). This has entries for all the immediate types, expanded to 32 bits, sign extended as required, as well as the rs1, rs2, and rd indexes. The funct3 and funct7 values are also extracted, and a copy of the instruction value itself (to aid debug). It also has a field for a copy of the decode table entryagain to aid debug.
The reason for decoding all possible fields, without discerning which are needed for a particular instruction is two-fold. First it means the decode structure is common to all instruction methods, allowing the table structure and function point method to be implemented, and because this is how the first state of a logic decode implementation is likely to be constructed. This model is a prelude to a logic implementation, and will be used to verify and debug the hardware. Constructing it in such a way as to cross-check with logic will aid in its speedy delivery.
The primary_decode method returns a point to a decode table entry of type rv32_decode_table_t. This structure has three fields:
The sub_table flag is invariant in its function and allows a decode table structure to be implemented with varying levels, mixing pointers and instruction entries. The RISC-V instruction set is decoded with various fields depending on the instruction type ([1] Ch. 2, sec 2.3). For U-type and J-type only the 7 bit opcode field is used, and the bottom two bits are always set for 32 bit instructions. For the I-, S- and B-type instructions a 3 bit field (funct3) sub-divides the decode further. The R-type instructions decode even further with a 7 bit field (funct7). The system instructions, potentially expand the funct7 bits to 12 (though only a few bits are used). With this in mind the decode structure has primary, secondary and tertiary decode tables. An example structure is shown below.
The primary decode table (primary_tbl) entries hold the decode of the instruction opcode field. This table is 32 entries long in the base class, as the bottom two bits are always 11b for 32 bit instructions, leaving 5 bits to decode. Where no further decoding is required, such as for the JAL and AUIPC instruction, the table entry holds an instruction entry (shown in green), with the instruction information and the pointer to the instructions method. If no valid instruction exists at that decode point, it still has an entry but points to a reserved instruction method to handle that situation (shown in red), but the decoding is unaware of this. If further decoding is required, then the entry is a pointer to another decode table (shown in blue), with sub_table set true. From the primary table, a secondary table exists for each entry that requires a funct3 decode. These tables have exactly the same format as the primary table, and so can be a mix of instruction entries, or pointers to tertiary tables. The tertiary tables decode on funct7 (or the top 12 bits, depending), and should have no sub-tables (which is checked for in primary_decode()).
When an instruction entry is reached, the primary_decode method returns the instruction table entry for passing to execute().
The decode tables are initialised in the base classs constructor, filling in the tertiary, secondary and finally primary tables. Where instructions are not implemented in the base class, the tables are filled with pointers to the reserved instruction method. Child class constructors can then override this adding new instruction methods for those implemented by that class, allowing expansion of the base functionality. The base class constructor will be called first, so the derived classes will override the reserved instruction entries correctly.
ExecutionThe execute method takes both the decoded instruction data, with the instruction field information, and the decode data entry, containing the pointer to an instruction method, as inputs.
Before acting upon the decoded data, it checks for any interrupt status by calling the process_interrupts method. For the base class, this does nothing, but expansion classes can add interrupt functionality and the method returns non-zero to indicate an interrupt is active, in which case execute returns without executing the decoded function, though not with an error status.
If no interrupts are outstanding, then, if enabled, a check is made whether an unimplemented instruction was executed and execute returns with an error status. This allows external control of execution, breaking on an unimplemented instruction.
Finally, if no interrupts and no breaking on unimplemented instructions, the instruction function pointer is used to call the method for the decoded instruction, passing in the instruction decode information structure.
InstructionsThe instruction methods all have the same prototype:
void rv32i_cpu::<instruction>(const p_rv32i_decode_t d)
Just the instruction decoded information is passed in, allowing the method to extract what values it needs, without further decoding. The method all follow a basic execution pattern as well, with a disassembly macro call, appropriate to the instruction format type, followed by the actual instruction execution code, and a call to increment_pc()except for jump and branch instructions. For branch, the PC increment is only called if the branch not taken. For the jump instructions it is not called. Similarly the system instructions do not increment the PC.
The instruction decode methods are simple and only a few lines of code. The bulk of the work was done in the decode, and the actual instructions are easily executed with few linesafter all, we are running on a computer with very similar operations implemented in its CPU. A couple of example instruction methods, for BEQ (branch if equal) and R-type XOR instructions, are shown below:
Note that the branch instruction only executes the instruction code if not disassembling. This is because, when doing linear disassembling, we dont want to take the jumps. Normally the functions are allowed to continue regardless of disassembly mode, to avoid adding unnecessary code, but this cant be done for branch, jump or system calls.
TrapsIn the base class implementation, traps are caused by only a limited set of conditions, all of which are classed as synchronous.
Since the base class does not implement the CSR registers, and thus has no mtvec to redirect to a configured address on a trap, a trap will cause a jump to a fixed address at defined as RV32I_FIXED_MTVEC_ADDR, specified in rv32i_cpu_hdr.h.
The trap detection is distributed amongst the internal memory access methods (readmem(), writemem()) and the implemented system instruction methods (ecall() and ebreak()). All call the process_trap() method, with the relevant trap type passed in. As mentioned before, the process trap method is a virtual function, and can be overloaded to implement the more sophisticated processing using the CSR registers for exception handling.
Internal MemoryThe base class has a simple internal memory. It is a byte array, large enough to hold RV32I_INT_MEM_WORDS words (or four times as many bytes). Its main purpose is to allow basic testing of the model without the need to implement an external memory system, hooked in via the external memory access callback function. It is located from a base address of 0.
It may still be used as memory even if a callback is defined, as if the callback returns an access as unprocessed it is offered to the memory. At this time, the internal memory cant be relocated in the address map.
Other Important Internal StateOf the remaining state held in the base class a couple are worth mentioning. Although the use of a cycle count is not visible to running software until the Zicsr functionality is added, a cycle_count member variable is defined, and is maintained. Firstly it is incremented the execute method after each call to an instruction method. Secondly, if a memory access callback is defined and is called with the cycle count passed in, and any returned delay value (i.e. wait states) is added to this value.
The real time clock value (mtime) and the time compare register (mtimecmp) are not in CSR registers (see [2] sec 3.1.10), but memory mapped to the address space. So the base class defines an internal member variables, mtimecmp. If an access to memory access either of the two words mapped from RV32I_RTCLOCK_CMP_ADDRESS, then it will read or update the 32 bit half of the 64 bit value as appropriate. Similarly at RV32I_RTCLOCK_ADDRESS, and the next word, if read, then the actual real time is returned in units of 1μs. Writing to these locations have no effect. Within the base class, no interrupt is generated on the time compare, this feature being added by the rvcsr_cpu derived class (see next section). The locations of the time values is fixed in memory, and if a memory callback processes these location then it will effectively mask the functionality.
Zicsr ClassThe rv32_csr class is the first extension class, implementing the Zicsr extension specification, with the CSR access instructions and implementation of CSR register functionality ([1] Ch. 9, [2] Ch. 2, 3). This class has the following features (added to the rv32i_cpu class features):
CSR Functionality ImplementationThe actual CSR register space is implemented in the base class, but the functionality is added in this class. The way this works is to access the base class register space via an access_csr method, and a csr_wr_mask method. The latter of these is a simple switch statement on a passed in address, returning a write mask for an implemented register, with an unimp flag returned as false, or 0 with the unimp flag true, if the register is not implemented.
The access_csr method takes several argumentsfunct3 to do some access type decode, the CSR address, the destination register index and the source register index/immediate value (depending on access type). The method makes some initial checks for sufficient privilege level (this implementation is always privileged, set at machine mode), before calling csr_wr_mask. If the destination register isnt x0, then it will load this register with the contents of the CSR register being accessed (if implemented).
If the destination is writable and implemented, then it will update the CSR register, masking with the mask returned by csr_wr_mask. For the case of set and clear instructions, the source register/immediate value must be non-zero to be a valid write access ([1], sec. 9.1), and this is checked before the access. If any of the access criteria fail, then process_trap() is called with an illegal instruction type
The access_csr methods is called from all the CSR access instruction methods, and implements the instructions functionality in one place, with the actual instruction methods simply accessing the disassembly macro for CRS instructions, calling the access_csr method, and then calling increment_pc().
Extended System InstructionsThe rv32csr_cpu class extends the system instruction functionality with the mret instruction method. This updates the MSTATUS registers MIE and MPIE fields ([2] Sec. 3.3). It then updates the PC with the value in the MEPC CSR register.
Although the base class implements ecall and ebreak instructions, these are not overloaded by the rv32csr_cpu class. The base class methods make a call to its own process_trap method, and it is this function that is overloaded by the CSR class to implement updating the CSR registers required by the system call trap---that is the MEPC, MCAUSE and the program counter, based on MTVEC and trap cause.
InterruptsInterrupts, that is asynchronous traps, have one of three possible sources
As mentioned before, the CSR class add the ability to have external interrupts by allowing a callback function to be registered that is called at regular intervals up to once per instruction cycle. The implemented access to a real time clock in the base class can now be compared with the mtimecmp memory mapped register and raise an interrupt. Finally the MSIP field of the mip register being written can raise a software interrupt. All these are dependent on the global interrupt enable being set (MIE in mstatus) and the individual enables for the three types being enabled in mie (MEIE, MTIE and MSIE).
All this functionality is handled in the process_interrupts method, which overloads the base class method, called each time the execute method is invoked.
RV32M Extension classThe multiply and divide functionality is added by the rv32m_cpu class. Compared to the previously documented classes, this is relatively straight forward.
It has no additional API functions and just overloads the constructor. It is in the class's constructor that the decode tables are updated with the additional instructions, each of which has its own method in this class for the multiply, divide and remainder instructions defined in the specification ([1] Sec 7).
The class has no other methods or internal member variables and is, in this sense, a pure extension derived class. Since there are no traps associated with these instructions (such as divide by 0—[1] Sec 7.2, table 7.1), no overloading of the trap method is required.
RV32A Extension classThe atomic operation functionality is added by the rv32a_cpu class. Since the model has (currently) only one hart, atomic operations are not strictly necessary as synchronisation of memory accesses across harts is not an issue. In addition, even if multiple harts were implemented, this would only be necessary if a memory model that allowed out of order memory accesses to occur. However, the instructions associated with the extensions alter internal state, and this is model correctly.
The AMOxxx.W instructions are modelled simply as read-modify-write operations, and the aq and rl bits are ignore, as they would not change the behaviour of this model. The LR.W and SC.W instructions reserve and release an area of memory, the size of which is not specified in the RISC-V instruction set manuals [1]. The model specifies a 32 byte granularity as being typical for a cache line from a 32 bit embedded processor.
Since the aq and rl bits form part of the funct7 field of the R-type instructions, there are effectively four entries in the tertiary decode table (amow_tbl) for the AMO.W instructions. The rv32a_cpu constructor initialises the table so that for each of the funct7's four entry positions for a given instruction, the same instruction method is loaded. Since the bits are not processed by the instruction methods, then the same behaviour is required for the four possible combination of these bits.
RV32F Extension classThe single precision floating point functionality is added by the rv32f_cpu class. This not only adds instruction methods for the extended instructions, but it also overloads the CSR methods access_csr() and csr_write_mask() in order to add functionality for access to fflag, frm and fcsr CSR registers. In addition, the instructions now allow access to the floating point register set (f0 - f31) for the hart, defined in the base class.
A couple of choices were available for implementing the floating point extension; either using the SoftFloat library [5] or use the intrinsic floating point capabilities of the host machine and the C library functions. The latter is chosen to maintain the ethos of restricting the use of external libraries. In order to use this method the rv32f_cpu code includes the math.h, fenv.h and limits.h headers. With these access is available to functions and macros to test for states like infinity, not-a-number, sub-normal numbers etc.
Control is also given for setting the rounding mode of the host to emulate that of the RISC-V model. An update_rm method is defined for this purpose, along with a member variable (curr_rnd_method) to track the currently set rounding state, used by the method so as to avoid setting the rounding when already at the requested value. There is one issue that remains, in that the RISC-V specification introduces the concept of rounding to nearest even (RNE—[1] Sec. 11.2). There is no equivalent in the floating point C libraries or, indeed, the SoftFloat library. This class treats both RNE and RMM the same, setting FE_TONEAREST for both these mode. All rv32uf riscv-tests pass none-the-less.
The rounding mode, for the relevant instructions is set either from the rm field of the instruction directly, or through the rm field of the fcsr register. This created an issue in the decoding tables as there would be 8 secondary tables per instruction with an rm field in the funct3 position, which normally decodes for the secondary table indexes. For this class, all secondary table positions point to the same tertiary table for the OP-FP instructions, deferring the funct3 decoding. The OP-FP tertiary table is indexed by funct7, as normal, but quaternary tables are added, where relevant, to decode on funct3 where this is not the rm field for a particular instruction. The base class primary_decode method will raise an error if the decode tables are more than three deep, but a virtual method, decode_exception, normally returning an error, can be overloaded to allow deeper decoding, and this is done for this class to decode the quaternary tables for funct3.
The RV32F extensions add new CSR registers fcsr, fflags and frm. However, there is only one actual register, fcsr, and the other are just sub-fields mapped to a different address. The class overloads the access_csr and csr_wr_mask methods from the parent class to add these registers. The implementation still maintains these three registers as separate, and so the access code manages an update to one to be reflected correctly in the others.
As per the specification ([1] Sec. 11.2), floating point exceptions do not cause traps, but just update the fcsr/fflags registers, which must then be inspected by the software. These bits are cumulative, and need explicit clearing. The rv32f_class maintains these bits on exceptions in this manner (see handle_fexceptions method). The underlying host system also has equivalent state, used by the code to test for exceptions, and these, too, are cumulative. However, the code always clears the host exception status after processing an exception in order to detect new exception state.
In addition the mstatus register's FS field shows the status of the floating point module. At construction the bits are set for an Initial state ([2] Sec. 3.1.6.5). The specification also states that this field is read-only, but the riscv-tests write to this field to set its state to Off, and then checks that the fsw instruction does not store to memory. This model complies with these tests.
The RV32F extensions defined a new set of registers f0 to f31, separate from the integer registers, and most of the instructions use these for the floating point operations with just a few instructions that use integer registers for such things as exchanging between the f an x register set. The base class already defines these floating point registers, though unused by that class, and these are maintained as an array of uint64_t values, with the 64 bit width allowing support for both RV32F and RV32D extensions without the need to alter the base class. The rv32f_class does the conversion between the float and uint64_t types to maintain this consistency of state, using the map_float_to_uint and map_uint_to_float methods. This choice was made to simplify the exchange instruction methods, but also to ease the future enhancement of a save and restore function, where all state can be treated as integer values.
RV32D Extension classThe double precision floating point extension class (rv32d_cpu) very much follows the same pattern as the single precision class (rv32f_cpu). From a specification point of view the RV32D extensions drop the move instructions in favour of two new conversion instructions to convert between double and single precision values.
It would have been possible to upgrade the rv32f_class to handle both the double and single precision instructions with common single and double precision instructions pointing to the same instruction method, and decoding precision within that methods. However, this was not done. To do so would have saved some duplication of code, but would have required a different means to isolate support for the different extensions, making them fully independent, and the extensions added and controlled through the rv32_extensions.h header. If, for some strange reason, the RV32D extensions were required, but not the RV32F, then this would be difficult to achieve without either lots of compile directives or some mode control. The instruction method code for the floating point instructions (and, indeed, all the instructions) is small in comparison to, say, the decoding method. Thus the rv32d_cpu code is treated as if it were completely new instructions and the modest overhead in code support accepted.
RV32C Extension ClassThe compressed instruction class (rv32c_cpu) implements the decoding of the compressed 16 bit format instructions of the RISC-V RV32C extension ([1] sec 16.5). Like the other extension classes, this sits in the inheritance chain, between the base class and the top level. By default it is the next class after all the RV32G classes (but it needn't be).
Unlike the other extension classes, however, it does not add new instruction functionality by extending the decode tables, and linking them to new instruction methods. Instead it converts the 16 bit instructions into their 32 bit equivalents, and the passes them on to the primary decode method for processing. This way of handling compressed instructions is implied in the RISC-V specification ([1]) which, for each instruction, states their 32 bit equivalents, and it is likely to be the method that will be adopted in the FPGA based softcore implementation. There are some good reasons to do this from a model programming point of view as well. These reasons are twofold. Firstly, it makes the additional code much smaller and reuses the already implemented primary decode method, thus reducing the probability of introducing new defects, and making the code easier to understand. Secondly, and perhaps more importantly, it keeps the code largely decoupled from the other classes and the presence (or not) of a particular extension class in the hierarchy is not required by the compression class. Although the class converts for all the valid RV32C instructions, including the floating point loads and stores (both single and double precision), if a particular extension is not configured (rv32d_cpu, for instance), then any instruction converted to 32 bits will be treated by the primary decoding as an unimplemented instruction, just as if a 32 bit double precision instruction (in our example) had been read. Thus the compression class has no external dependencies because of choosing the conversion strategy over decode table extensions. In order to implement the conversion, the class overloads the following base methods:
The increment_pc() method in this class now manages updates of the PC to take into account the 16 bit compressed instructions, which may be freely mixed with 32 bits instructions without having to realign to a 32 bit boundary. This is managed in this method. The fetch_instruction() method, which is a simple read from memory in the base class, now becomes a method for detecting a compressed instruction, saving off unused bits from the 32 bit instruction reads, and calling the class's own decode method, compressed_decode(), to convert the instruction to a 32 bit equivalent. For 32 bit instructions, these are passed straight on without processing. The compressed_decode() method itself extracts the fields of the 16 bit instruction, and is basically an if/else tree to decode each unique instruction. Then the 32 bit instruction is constructed and returned by the method for processing by the rest of the model. One further difference when the rv32c_cpu class is inserted in the hierarchy tree is with the disassembled output. The format of the output remains unchanged, and the raw instruction code is displayed still formatted as an 8 digit hexadecimal number. To differentiate compressed values from 32 bit instructions (that might have the higher bits as zero) a 'tick' is added after the number to indicate it is a 16 bit compressed instruction.
The disassembled instructions, themselves, display as they would for 32 bit instructions. This matches the output generated by the RISC-V toolchain's objdump program. The leftmost address column will display addresses which can be aligned to 16 bits, with 32 bit instructions now possibly aligned to upper 16 bit boundaries as well. Top Level ClassIt is expected that a program wishing to use the model does not instantiate the base class or one of the extension classes directly, but a top level class, called rv32_cpu, provided for this purpose. This allows the supported functionality to be changed without the need to alter instantiating code.
Normally the rv32_cpu class will inherit the last ancestor of the base class, giving it all the functionality of the chain of derived classes (see Introduction). If custom functionality is to be added, then this could be done in this class, or by inserting a custom child class in the inheritance chain.
Defining Inheritance ChainAccompanying the rv32_cpu class is a header file, rv32_extensions.h, that define which extensions are to be added and the inheritance hierarchy of the model. An example contents of the extensions header is shown below:
The target class definition, then, picks out the point in this progression that is to be implemented---in this case the RV32I and RV32Zicsr functionality (as that is all thats implemented to date). Were it to choose, say, the RV32D point, and wished to drop RV32A extensions, then the F inheritance would be changed to rv32m_cpu, this skipping this extension class.
Once all the desired class inheritances are defined the headers for all classes to be used are included. This must be done last, as they uses the definitions to inherit the required class, based on these macros.
One final definition is for the RV32E functionality. This extension is simply to reduce the number of the registers defined for each hart, which defaults to 32, but is reduced to 16. If the RV32_E_EXTENSION definition is uncommented. This than compile the base class with only a set of 16 registers, and will trap if others are accessed.
Using the GUI to Auto-generate the Extension HeaderSince there must be a consistency between the definitions in the rv32_extensions.h header in order to compile correct, a utility is provided as a python GUI script to select the extensions that are required and then auto-generate the header file to the correct settings for the choices made. This script is in the iss/scripts folder as rv32cfg.py. When run, a GUI is presented as shown in the diagram below.
The GUI has three groups for configuring the ISS model: Extensions, Privilege levels and Architecture. Since the model currently only supports a machine privilege level, and a 32 bit architecture, the selection buttons in these groups are fixed and disabled, ready for enabling when these additional features are added. For the 'Extensions' group, a series of check buttons are presented for adding and removing the various supported extensions. Since a RISC-V processor must have the base instructions (RV32I), and the model has Zifencei features simply as a consequence of its implementation, these are fixed as selected and the check buttons disabled. For the rest of the extensions selections, these may be changed as desired, with the default settings as shown in the diagram above. Some buttons are 'linked' to avoid conflicts or unsupported combinations. The double precision floating point extensions ('D') rely on the single precision extensions to be present in this ISS model (which is probably not a RISC-V specification requirement, but an unlikely situation). Therefore, if the 'F' box is unchecked, the 'D' box will automatically get unchecked. Conversely, if the 'D' box is checked when the 'F' box is unchecked, the 'F' box will automatically get checked. The 'G' extension is really an abbreviation for the presence of the I, M, A, F, D and Zcsr extensions. The checkbox will automatically be checked when all those extensions are selected, and unchecked if any one of those is unchecked. If one or more are unchecked and the 'G' check box is selected, then all the relevant extensions get selected. Since unchecking the 'G' checkbox when all the relevant extensions are present has no real meaning, a warning message box pops up to indicate this. The generated file, though, is not affected. In the 'Files' group, the output header file is specified where the generated data is to be written. Assuming the script was run from its original place in the repository, the default file specified is the existing header file in the source directory (iss/src), but the dialogue box may be updated for a different file, or the 'Browse' button used to locate another file as the target. Once the configuration is chosen the 'Generate' button can be clicked to generate the configuration. A messag e box pops up afterward to indicate that the generation has completed. Development EnvironmentVarious development tools have been used in the construction of this model. Some are essential parts of the process, and have support as part of the package, whilst others are used as convenience utilities (of varying usefulness). This section list the tools used and any dependencies and assumptions that may have been made.
The actual model source code has be written to be, as largely as possible, to be stand alone and not to have a complex set of external dependencies. A couple of development environments have been used (see below) and supported in the package, but the code should compile with any modern c++ compiler, of that is more convenient. Support for these, though, must come from the user.
RISC-V ToolchainIn order to compile test code, a RISC-V toolchain is required. Minimally we need an assembler, though the riscv-tests use a C pre-processor as well. The Gnu Compiler Collection (gcc) supports RISC-V, and this was used in the testing of the model. In particular the riscv64-unknown-elf, with gcc version 10.1.0 toolchain. Tat the time of writing, pre-built binaries for windows exist at the following link:
sysprogs.com/getfile/1107/risc-v-gcc10.1.0.exe
These can be installed anywhere thats convenient, though the scripts assume that the bin directory has been added to PATH. Note that this is a risc-v 64 toolchain, but supports compilation to the risc-v 32 ABI. For Linux, the toolchain used was from some pre-built executables obtained from https://github.com/stnolting/riscv-gcc-prebuilt
This toolchain was built for rv32i flags, and so the executables have a prefix of riscv32-unknown-elf-. This build uses gcc version 10.2.0.
Compiling CodeTo compile code one can use either the assembler or gcc. The riscv-tests must use gcc to get the pre-processing features but, if writing ones own tests that do not use this, then the assembler is all thats required.
Using AssemblerTo compile an assembler program with the toolchain, to the RV32 ABI, something like the following commands can be used:
riscv64-unknown-elf-as fpic
march=rv32i aghlms=<testname>.list \
With these two commands, an ELF executable is produced which is suitable for loading into the model. It specifies that the _start symbol is address 0, the object file is made relocatable and it uses RV32 ABI standards (rather than RV64). The assembler produces a listing, and the command line options basically turn just about everything on.
Using gccCompiling with gcc instead of the assembler is fairly similar, requiring options to specify the correct ABI standard
riscv64-unknown-elf-gcc -c -fpic
-march=rv32i -mabi=ilp32 \ riscv64-unknown-elf-ld <testname>.o Ttext 0x0 melf32lriscv \
The gcc command still compiles a relocatable object file, but will also need a set of I include path options. When compiling of the riscv-tests, this might be:
-I.-I<TESTENVDIR>\p I<TESTDIR>\isa\macros\scalar
The <TESTENVDIR> and <TESTDIR> paths are for the locations of the riscv-test-env and riscv-tests repositories.
Development ToolsIt has always been the intent to target the model for both a Windows and a Linux platform. As such two development environments have been setup, and the setup files checked-in as part of the package. For Windows 10 and Ubuntu 20.4LTS were the two development environments.
Visual Studio Community 2019 (Windows)Visual studio 2019, community edition is freely available for non-commercial use, and Version 16.10.2 was used in the models development. As of writing, this is available from the following URL:
https://visualstudio.microsoft.com/vs/features/cplusplus/
In the iss/ directory of the package is a folder visualstudio/, which contains the top level solution file and project files for the rv32 executable. The solution compiles the model into a library, and a separate folder, in the iss/ directory, (librv32) contains the project files for this.
In general, if Visual Studio is installed correctly one need only open the solution file in visualstudio/ and the IDE will find the rest of the project files. A screen like that shown below should be apparent.
When the solution is built, the library, librv32.a will be located in librv32\x64\Debug. If the active configuration is Release, this replaces the Debug in the path. If win32 was selected (not recommended), this deletes the x64 part of the path. All combinations should work.
Eclipse (Linux)For Linux development the Eclipse IDE was usedin particular version Oxygen.3a Release (4.7.3a, March 2018). This, like visual studio, is feely available and, as of writing, is available at the following URL:
In the iss/ directory of the package is a folder eclipse/, which contains the top level solution project files for the rv32 executable. There are also project files to compile the model into a library, and a separate folder, in the iss/ directory, (librv32/eclipse) contains the project files for this.
In general, if Eclipse is installed correctly one need only import thee existing project files as librv32 and rv32, and they should compile. Once imported, a screen like that shown below should be apparent.
Other Utility ToolsOther tools have been used in this development that need not be utilised but have proven useful, and some of which are assumed in the accompanying scripts. This section lists these and their uses within the project.
MSYS (Windows)In Linux, if gcc is installed (which it usually is), certain utilities come as standard, one of which is make. On Windows this is not the case, but the compilation of RISC-V tests using the provided scripts (e.g. run32i_tests.bat) rely on make being available. It so happened that MSYS 1.0 was already installed on the original development system, but MSYS 2.0 would probably work just fine as well. As of writing MYS 1.0 can be found at the following URL:
http://downloads.sourceforge.net/mingw/MSYS-1.0.11.exe
This has many Linux shell utilities, including make. The scripts expect the MSYS binary directory to be in the path. E.g. <msys install dir>/1.0/bin.
Git and Tortoise GitGit is not required to compile and run the model, but if one wishes to develop and even contribute to the project, then it should be made available, particularly in pulling and pushing from github.com. Github is available for Windows and Linux at the following two URLs:
https://git-scm.com/download/win
https://git-scm.com/download/linux
On windows, an excellent accompanying tool for git is TortoiseGit, which provide a front end to git, making it much more easy to use. It is not exactly a GUI, but integrates itself into windows explorer, showing information about the modifications state, and extending the menus to allow the various operations. This is not essential in using git, but that tool can have some esoteric usage, and TortoiseGit manages this admirably. It is freely available at the following URL:
An example window from rv32 is shown below:
VerificationTop Level ProgramAs has been mentioned above, the model is compiled as a static library (librv32.lib or librv32.a). In addition to this there is a top level project (rv32) which wraps the library into a compilation for an executable that can load programs and run them on the model. The main purpose of the program is to run the self-checking verification tests. The program provides various command line options to control its operation.
Command Line OptionsBelow is shown the usage message for the rv32 executable.
The main command line options specifies which ELF test program is to be loaded and executed (-t)with a default of test.exe. The a various set of options control when the program is to be terminated (if at all) This might be after a number of instructions have been executed (-n), if an unimplemented instruction is encountered (-H), or at a specific address (-b and -A). Finally, a set options enable disassembled output, either as a static list (-d) or during run-time execution (-r). This debug output can be redirected from stdout to a specified file with the D option.
When running tests from the riscv-tests suite (see next section), particularly from within a debugging session, the following command line options are recommended.
rv32.exe r b D debug.txt t <testname>.exe
With these option, the code will run, sending disassembled output to debug.txt and break on address 0x00000040 (the default), which is the <write_tohost> location, which loops forever. At this point, the code is expecting 0 to be in register x10, indicating no failures and 93 to be in x17 to verify it went through the pass or fail parts of the test program and finished. If both conditions match when the program, is halted a Pass message is printed, else a Fail message and the two codes in the registers are output.
Test SuiteThe model is uses the RISC-V unit test suite (riscv-tests) to do a large part of the verification. These tests rely on the RISC-V test environment (riscv-test-env), and these two repositories are on git-hub at:
https://github.com/riscv/riscv-tests
The model is constructed in such a way that these test may be run without the need for modifications, with the potential of introducing issues and false positives that this could bring. All of the tests run have come from the isa/ folder, and the table below shows the status of the model against the tests.
NOTES:
A batch file is provided (run32i_tests.bat), in the iss/test folder, to compile and run all the above tests that currently pass. The scall.S test is excluded as it does not meet the proper exit criteria, even though it tests without error. This provides a useful, though not complete, regression test for any changes to the models source code.
Compiling TestsA makefile is provided in the test folder to compile the tests form the test suit. It assumes that the cross-compiler tool chain is installed and paths setup (see Development Tools section). It also assumes that the test suit and environment are checked out at c:\git, though this location can be changed by updating TESTSRCROOT. To compile a test from the suitesay sra.Sthe file must be specified along with the subdirectory in which it is located. There are defaults, but it is useful to specify these explicitly on the command line using the FNAME and SUBDIR variables. So, for example, to compile sra.S the command might look like the following:
make FNAME=sra.S SUBDIR=rv32i
The command will build this test, placing the executable in the test folder as sra.exe, which is suitable for loading and running by rv32.exe. The run32i_tests.bat script uses the makefile to compile, afresh, its listed tests when running through the regression.
Co-simulation with ISSThe ISS is provided with the code to run the model with an HDL test environment and co-simulate RISC-V embedded software with logic in a Verilog or mixed language simulator. The advantages of doing this a many fold. Firstly, if developing a RISC-V based SoC, with peripheral components, such as a memory sub-system, serial interfaces (SDIO, SPI, I2C etc.) or custom IP, the processor logic IP may still be in development or unavailable, but development of the embedded software to control the peripheral logic can proceed, along with the logic development using the co-simulation environment. Secondly, the model of the processor is running as code on the host PC or workstation, and not consuming simulator computation effort, and is therefore lightning quick compared to a full logic model of the processor. This makes simulations for the new IP under test much faster, tightening the debug loop for both the logic and embedded software. Exploratory software and logic prototyping also becomes a quicker and more attractive proposition. Once Embedded software and logic IP are developed, the software can be migrated directly to the processor implementation, giving dual payback on the software development, and early integration completion on code that has been already tested to a high degree.
The Co-simulation EnvironmentIn the repository is a directory called iss/cosim, which contains the top level Verilog processor component (in the verilog folder), and a test folder which, in this package, has all the files required to co-simulate with ModelSim. The environment should be easily adaptable for other simulators.
The co-simulation environment relies on two other projects to implement the co-simulation capabilities. Firstly a virtual processor, VProc [6], that provides a connection between the simulation environment, via PLI, and some generic C/C++ code compiled for the host system, and providing some simple means to read and write to a memory mapped space, as well as a means to advance time (without a read or write access). It also uses a C/C++ memory model [7], also with a PLI interface to a Verilog component, to implement a memory that has access to all 232 address space locations, without reserving vast amounts of memory, or implementing a large memory in Verilog. The two references for these components at the ned of the document ([6], [7]) contain the links to these components' repositories on github.
With the VProc virtual processor providing the means for running any generic program compiled for the host to access the address space, it is a small step in conceiving that this program can be the rv32_cpu ISS model, along with some lightweight code to connect to VProc via its API. The diagram below shows the example test environment provided in the rv32_cpu repository.
Here is shown a top level test bench (tb) containing the riscvSim component that wraps the VProc co-simulation component, and the memory model (mem_model) component. It also provides a clock (nominally at 100MHz, but configurable) and a reset. A means to programmatically halt the simulation is also provided by reserving a specific address which, if written, halts the simulation.
The riscVsim wraps the VProc component and provides a memory mapped bus with 32 bits address, a read port, a write port and some byte enables. In addition it has a single IRQ input, which is sends to the VProc component. Without going in to too much detail (as this is well documented in [6]) the VProc component talks to its low level code via Verilog tasks, mapped over PLI to equivalent C functions. A separate thread is spawned to run user code, entered via a VUserMain0 entry function (equivalent to main()), and an API provided to this for reads, writes and ticks. The underlying VProc software co-ordinates communication between the user software, running in its thread, and the PLI software, called from the simulator. The VProc API also has a means for registering a callback function to be called whenever the VProc component has an active interrupt.
The VUserMain0.cpp source file, in iss/cosim/test/src, has code for instantiating and configuring the model and has two callback functions to be registered with the ISS for external memory accesses and interrupts (see the API section above). A third function is registered with the user callback of VProc, used by riscVsim.v to pass in changes of state of the irq input, closing the loop between the simulation interrupt signal and the ISS input.
The VProc user callback will be called for every cycle that the irq input changes, with its value sent as an argument. Although the callback is called from a different thread than the main user VProc code (it is called from the simulator side) the VProc CB function can only be active when the main thread is stalled on a read, write or tick, so it is safe to modify shared variables. Also, it is not valid to make further VProc calls from this CB, so updating state here should instigate required functionality in the main program flow. The callback simply sets a shared variable, vproc_interrupt_seen to true, or false.
The ISS interrupt callback will return an interrupt when vproc_interrupt_seen is true, else it returns 0. The wakeup time in this model is always the next cycle.
The external memory access callback of the ISS is the function that calls the read and write API methods provided by VProc, via some wrapper functions coded in mem_vproc_api.cpp. The functions virtualise away the need for configuring the byte enables and aligning the data in the correct lanes for the 32 bit data bus, before instigating the actual memory accesses. The VProc component can only transfer 32 bit data in a given access, but has the means to configure much wider data using delta time updates (see [6], and [4] for a complex usage example). The wrapper functions use this to set the byte enables prior to an access cycle.
This is all that's required to hook up the ISS to a simulation. Command Line OptionsThe verification top level code, discussed in the Verification section, has a set of command line options to configure the model when run. The code running on the virtual processor does not have access to command line options as it is called from the host simulator. However, a means is provided for setting command line options from within a file, vusermain.cfg, which is read by the top level code and processed as if this were the original ISS verification command line arguments. An example configuration is shown below:
vusermain0 -rbH -D disassem.log -t ../../test/lw.exe
The first field identifies which VProc node the command line is for (always node 0 in this case), and the rest of the line is just exactly the same command lines as for the verification top level.
As in the example above, RISC-V programs that have run on the normal ISS can now be run in the co-simulation environment. The difference is that the program is loaded into the memory model from the top level code, via the direct access API (see [7]), and all instruction fetches, data loads and data stores are directed to the simulation, via the external memory access callback function. The diagram below shows a waveform capture of part of the sh.S test from the riscv-test repository.
The waveform shows two instructions at 0x02e8 and 0x02ec, which disassemble to
000002e8: 0x002093a3 sh sp, 7(ra) 000002ec: 0x00001217 auipc tp, 0x00001000
Compiling and Running the SimulationPrerequisitesThe provided makefile allows for compilation and execution of the example simulation test. As mentioned above it is only for ModelSim at this time, and has some prerequisites before being able to be run. The following tools are expected to be installed
The versions mentioned above are those that have been used to verify the environment, but different versions will likely work just as well. If MODEL_TECH environment variable is set correctly, and MinGW and Msys bin folders added to the PATH, then the makefile should just use whichever versions are installed. Note that the test code must be compiled for 32 bit, which the co-simulation test makefile does. This is required for ModelSim PLI code and may be different for other simulators. So, if compiling PLI code independently of the VProc makefile then remember to add the -m32 flag.
Using makeThe entire body of code needs to be compiled to shared object (DLL, in Windows parlance), including the ISS library, so that it may be loaded into the simulator. The VProc code, memory model code and user code (VUserMain0, and associated source) are catered for using a makefile in iss/cosim/test. The ISS library needs to be linked with this code as well, but the library generated by Visual Studio is not so easily linked to the (required by ModelSim) 32 bit MinGW executable. Therefore a makefile for MinGW compilation of the library is provided in iss/ and the test makefile calls this to generate a suitable library for linking.
The test makefile can both compile and run C/C++ source and also run the simulations. Typing make help displays the following usage message
Giving no arguments compiles the C/C++ code. The compile argument compiles the Verilog. The various execution modes are for batch, GUI and batch with logging. The batch run with logging assumes there is a wave.do file (generated from the waveform viewer) that it processes into a batch.do with signal logging commands. When run, a vsim.wlf file is produced by the simulator, just as it would when running in GUI mode, with data for the logged signals. The make wave command can then be used to display the logged data without running a new simulation. Note that the batch.do generation is fairly simple at this point, and if the wave.do is constructed with complex mappings the translation may not work. The make clean command deletes all the artefacts from previous builds to ensure the next compilation starts from a fresh state.
The top level user code emulates the ISS test top level and looks for PASS/FAIL criteria in the same manner. If riscv-tests are run, a similar output is printed to the simulator console, including the pass and fail messages.
Note that for ModelSim it is inadvisable to send debug information to the simulation console. It appears as if it fills a buffer and then freezes advancing time. If debugging enabled (-r or -d options) specify a debug file with the -D option
Remote GDB InterfaceA GDB interface is available for connecting the model with a GDB session via a remote target using a TCP socket. It does this, when configured, by opening a TCP socket on a given port and advertising the port number, which can then be used by GDB to connect to the model using its command target remote <device>. With this arrangement the model then looks like a hardware system connected to the host via a TCP/IP connection. One important difference is that the debugging is non-intrusive on the model. Normally for hardware systems connected via a serial port a 'stub' is required to be compiled with the program ([8], section 20.5), along with some user supplied routines that know about the local serial interface protocols etc., that intercept interrupts and communicate with GDB to affect the debugging functionality. With this implementation, and the advantages of visibility within the model, the code being debugged does not need to be modified with an additional stub. As mentioned elsewhere, it is expected that the RISC-V tool chain for the processor is available to use the GDB facility. In particular, the GDB program that must be used is riscv64-unknown-elf-gdb (or riscv32-unknown-elf-gdb). Supported FeaturesThe implementation supports only a subset of the possible
GDB commands that can be sent over a remote interface, but it supports more
than the minimum required ([8], section E.1).
In addition, soft breakpoints are implicitly supported via the memory read and writes, as GDB substitutes the instruction at the break point by reading (and storing away) the original instruction, and writing an ebreak instruction in its place. The breakpoint interrupt is raised when the break instruction is reached and the model returns control to the GDB interface. Before resumption, the original instruction is restored with a further write to memory. Soft breakpoints, in reality, can only work in code that is in volatile memory, where the instructions may be overwritten. In the model all code resides in 'memory' that can be overwritten, and so this technique can be used on code, even if it is destined for ROM of Flash. Currently only support for single threaded code is implemented, though this may change in the future. UsageThe GDB interface is activated using the command line option -g on the rv32 executable. The -p option is available to run in remote gdb mode and the TCP port to use, if different from the default. The interface itself is not part of the rv32_cpu class (or its ancestors), as it needs to sit on top of the model to control it. It is implemented in the files rv32_cpu_gdb.cpp and rv32_cpu_gdb.h, and any new projects must include the header and compile in the source code in order to use it. A single function constitutes the API: int rv32gdb_process_gdb (rv32_cpu*
cpu,
The function expects a pointer to an rv32_cpu object, which has been created and configured prior to calling the function. The configuration can include the loading of a program in to memory, though this would normally be done from within the GDB session. A second argument specifies the TCP port number to use, depending on the configuration of the third argument, which contains a flag to specify a TCP socket.
When run (e.g. rv32 -rbH -g) the function will not return until it either losses attachment to a GDB session, or some error has occurred. The function returns 0 for a normal termination, otherwise an error occurred. Once called the function opens a TCP socket with the given port number and prints out the port details with a message. E.g.:
RV32GDB: Using TCP port number: 49152
The GDB session uses this port number to connect as <hostname>:<port#>. The hostname can be a host on the network if connecting from a different computer, or localhost, if running on the same machine. Actually, if the host name is omitted (but not the colon), this defaults to being the local host. E.g. from the gdb session:
(gdb) target remote :49152
A typical session might look like the following. In this example one of the test programs is used as the code to debug, and compiled with symbols include
riscv64-unknown-elf-as -fpic
-march=rv32i -g <fname>.s -o <fname>.o
Assuming that rv32 is run with the -g option (and any other appropriate options, such as, say, -bH to halt at an address or unimplemented instruction) then the GDB session, in separate terminal, can be run something like the following session:
GNU gdb (GDB) 9.1 Copyright (C) 2020 Free Software Foundation, Inc. License GPLv3+: GNU GPL version 3 or later <http://gnu.org/licenses/gpl.html> This is free software: you are free to change and redistribute it. There is NO WARRANTY, to the extent permitted by law. Type "show copying" and "show warranty" for details. This GDB was configured as "--host=i686-w64-mingw32 --target=riscv64-unknown-elf". Type "show configuration" for configuration details. For bug reporting instructions, please see: <http://www.gnu.org/software/gdb/bugs/>. Find the GDB manual and other documentation resources online at: <http://www.gnu.org/software/gdb/documentation/>.
For help, type "help". Type "apropos word" to search for commands related to "word"... Reading symbols from simple.exe... (gdb) target remote :49152 Remote debugging using :49152 _start () at c:\git\riscv-tests\isa\rv64ui\simple.s:16 16 RVTEST_CODE_BEGIN (gdb) load Loading section .text, size 0x1c4 lma 0x0 Loading section .tohost, size 0x48 lma 0x1200 Loading section .got, size 0x28 lma 0x1248 Start address 0x00000000, load size 564 Transfer rate: 23 KB/sec, 141 bytes/write. (gdb) b *0x100 Breakpoint 1 at 0x100: file c:\git\riscv-tests\isa\rv64ui\simple.s, line 16. (gdb) c Continuing.
Breakpoint 1, 0x00000100 in reset_vector () at c:\git\riscv-tests\isa\rv64ui\simple.s:16 16 RVTEST_CODE_BEGIN (gdb) stepi 0x00000104 16 RVTEST_CODE_BEGIN (gdb) 0x00000108 16 RVTEST_CODE_BEGIN (gdb) c Continuing.
Program received signal SIGTERM, Terminated. 0x00000040 in write_tohost () at c:\git\riscv-tests\isa\rv64ui\simple.s:16 16 RVTEST_CODE_BEGIN (gdb) detach Detaching from program: c:\git\riscV\iss\test\simple.exe, Remote target Ending remote debugging. [Inferior 1 (Remote target) detached] (gdb) q
In the above run, the compiled code (simple.exe) was debugged, as specified on the command line to the GDB program. Connection was established to the already running cpumico32 program in GDB debug mode with the target remote :49152 command. The program is loaded into the rv32 memory with the load command.
A breakpoint was set at address 0x100 with a software breakpoint (b *0x100). Execution is started using the 'continue' command (c)-as this is a remote debug session, gdb assumes the target is running already, paused waiting for commands. When the target reaches the breakpoint GDB halts and displays the source line of the breakpoint. Next the program is stepped (stepi) to the next instruction, before another 'continue'. The program breaks again when the model itself reached its halt address, returning a SIGTRAP. Detaching from the remote system (detach) ensures a clean exit by rv32, which then terminates.
Internal state can be inspected anytime the program has broken and returned to gdb. For example, to dump the state of the registers the command info registers (or i r) can be used. After the example test code is run, this produces the following:
(gdb) i r ra 0x0 0x0 <_start> sp 0x0 0x0 <_start> gp 0x1 0x1 <_start+1> tp 0x0 0x0 <_start> t0 0x17c 380 t1 0x0 0 t2 0x0 0 fp 0x0 0x0 <_start> s1 0x0 0 a0 0x0 0 a1 0x0 0 a2 0x0 0 a3 0x0 0 a4 0x0 0 a5 0x0 0 a6 0x0 0 a7 0x5d 93 s2 0x0 0 s3 0x0 0 s4 0x0 0 s5 0x0 0 s6 0x0 0 s7 0x0 0 s8 0x0 0 s9 0x0 0 s10 0x0 0 s11 0x0 0 t3 0x0 0 t4 0x0 0 t5 0xb 11 t6 0xb 11 pc 0x40 0x40 <write_tohost>
The above example shows the main points in using GDB to control and debug the model and a program running on it but, of course, there are many more features that can be used by GDB that are not shown in the above simple session. Any IDE using the relevant GNU toolchain, including GDB, can be used as a front end to the interface, giving full development capabilities to the model. Eclipse can be used, and has remote target capabilities, normally used to connect to a development system. Details of setting this up are beyond the scope of this document, but the diagram below summarises the connections between an IDE (such as Eclipse), the GDB debugger application (for rv32) and the model's GDB interface, via the TCP socket.
It would is also possible to do joint debug between Eclipse/gdb and a simulator, as the co-simulation code has the GDB interface added to it. Here the simulation is run with vusermain.cfg having the -g options added to the command. The simulations will start, with waveforms or not, depending on the make command (make gui or make log etc.), and will initialise a socket as above. This is connected to in the same way as before from the gdb side. When the program is allowed to continue it will advance the simulation. If a software break point has been set up, and is reached, then gdb will break, as before, but note that the simulator is hung waiting for the gdb session to return control, so one cannot manipulate the GUI window. If the simulator had a break point set-even something as simple as a run 10us-then the simulation will stop at that point. Now the simulator window can be controlled and state inspected, but the gdb session is waiting on the simulator. So joint debugging requires co-ordination between breaking at certain software places and at defined simulation places, where the appropriate state inspection is required. Both sides of the debugging won't be active simultaneously, but it does at least allow co-ordination of inspecting state between the software and the logic it may be controlling to facilitate easier debugging. Planned EnhancementsExtension SupportAs mentioned right at the beginning, in the introduction, the basic model implements the RV32I and Zicsr functionality, with Zifencei implied. RV32E is also available via a compile definition. The model is constructed to be easily extensible for the other specifications, beyond the RV32G specification ([1] Ch. 24), and for customisation.
Beyond this, the RV32C extensions are not yet slated for implementation, but the model was designed with this in mind, with virtual functions allowing compressed instructions to be managed with overloaded methods. No plans beyond 32 bit are made. This model is a prelude to the construction of an open source soft-core, aimed at FPGAs, and the performance from 64 bit implementations doesn't fit well with that kind of target platform. This is more like a counterpart for, say, the Lattice Semiconductor mico32 processor, an ISS model of which has already been constructed [3]..
Appendix A: Running and Debugging with the Model in an IDEIn the GDB Interface section it was indicated that, having connected the model to GDB, it could therefore be integrated with IDEs such as Eclipse. In order to do this, some configuration is necessary. In this appendix an example of configuring Eclipse is given using the test.c example provided with the package. The example is for the Windows environment and for the Proton version of Eclipse (version 4.8.0). The configuration details are similar under Linux and various previous versions of Eclipse.
Compiling Example C Code
The test.c example, located in directory iss\test\c\, must be built generate test.exe, and this is simply a matter of going to the code's directory location and running make:
cd <repo location>\iss\test\c make
EclipseHaving built the example code to specification for debug, Eclipse must be run and a project created and configured. It is assumed you have Eclipse installed with the CDT (C Development Tooling) extensions (https://eclipse.org/cdt/). Create ProjectCreate a new project with File->New->Project, and under the C/C++ 'folder' select the 'Makefile Project with Existing Code' and press 'Next'. The window that appears can have the Project name, say, example_c, and the Existing Code Location updated using the Browse button, and navigating to the <repo location>\iss\test\c directory. The Toolchain for Indexer Settings should default to <none>, or should be set so if not already.
Configure ProjectThe project just created must now be configured. Here we are going to set up some paths for the code, specifically for the ancillary driver code, and then specify the debugging criteria.
To start, the debug configurations are set. From the main window choose Run->Debug Configurations.. From the opened window a new C/C++ Remote Application is created by right clicking the appropriate entry in the left hand pane, and selecting the 'New' icon above the pane. Assuming the example_c project is still open and selected, the right hand pane should show details of the new project, and have some fields already filled in.
From the Main tab, the C/C++ Application field should be updated by browsing to the location of the previously built test.exe file in <repo location>\iss\test\c\ directory. In addition, Disable auto build should be selected.
By default, Eclipse will usually select Using GDB (DSF) Automatic Remote Debugging Launcher. This would be for connecting to a remote server and launching and configuring gdbserver on the remote system. This is all taken care of by the model's GDB interface, and so we need Manual mode. To change click Select other. and, in the resultant window, check the Use configuration specific settings, and select Using GDB (DSF) Manual Remote Debugging Launcher.
Many of the fields in the configuration window's Main tab should now disappear. When this is all configured, the window Main tab should look something like the following:
Now select the Debugger tab to configure the debugging program, and connection details. In the Main sub-tab, the GDB Debugger field should be changed to riscv64-unknown-elf-gdb (or riscv32-unknown-elf-gdb if that's what you have installed). This assumes that this tool is in the search PATH. If not, then the Browse button can be used to navigate directly to the executable. The GDB command file field should be blanked, unless you wish to specify some commands. Note, however, that not all possible commands will work properly (such as connecting to remote target and loading code) as, after the command file is run, Eclipse will send commands to gdb to do connections to remote target, and the user commands can interfere with this with out of order issues.
The Connection sub-tab must then be selected. In this example, the Type is chosen as TCP, the Host name or IP address field should be localhost, and the Port number is set to 49152 (0xc000 in hex-the first unreserved port number). You can, of course, choose a different port number-the model supports defining this on the command line.
It is up to you whether you wish to Stop on startup at: main. You can uncheck this, or change to some other location, such as _start-the entry point in crt0.s. When configuration is compete, click Apply, and close the Debug Configurations window. On completion, the window should look something like the following:
Debug Code
Having chosen a manual remote debugger launch, we must fire up the model ourselves and load the target code.
cd <repo location>\iss\test\c ..\..\visualstudio\x64\Debug\rv32.exe -reHg -S0x1008c-t test.exe
The -S0x10008c is the location of the _start label. RISC-V processors do not have a specified reset start address, and so a compile program may have the _start location different from the model's default of 0. If make was used to compile the test code, then the location of the start address will have been printed, and this should be used. When run with these arguments, a message should appear: RV32GDB: Using TCP port number: 49152, indicating the model is waiting. The debugging session can now be started. From the menu select Run->Debug Configurations., and chose example_c Default and click the Debug button on the toolbar. If all went well, the model should have printed a message:
RV32GDB: host attached.
In Eclipse, the main window should show the code stopped in the main() function, ready for debug, if 'Stop on startup at: main' was selected . All the facilities for debugging should now be available for stepping code, setting breakpoints, and inspecting state etc. When run once, instead of Debug Configurations., it can be run again much more simply using the 'Bug' icon in the tool bar. The pull-down menu from this has the last few runs listed, and example_c Default can be selected directly from here.
When debugging is finished by pressing the stop toolbar button, you can check the model exited cleanly as the following message should have appeared, and the executable exited.
RV32GDB: host detached or received 'kill' from target: terminating.
For each new debug session, the model must be relaunched manually before running the debugger again. This is all that is needed to integrate the model with Eclipse, and debug a program, but Eclipse can be, configured to launch the model automatically, before running the debug session, avoiding the need to run the model from a command line prompt each time. This is optional, but makes for more convenient debugging.
Launch group for running model and debuggingTo automatically run the model before debugging in Eclipse we must create a Run configuration to execute the model, and then a Launch Group to combine the model execution with the debugging session. The run configuration is similar to the debug configuration set up as described previously. To create a Run configuration for rv32 select Run->Run Configurations., and create a new C/C++ Application, naming it rv32iss. On the Main sub-tab, for the C/C++ Application field, Browse. to debug build of rv32.exe. Also, disable auto build. In the Arguments sub-tab, set to:
-reHg -S0x0001008c -t test.exe
Even though we have made a Run configuration, an issue arises when it is executed where it appears to still stop at start up. To avoid this, open up Debug Configurations, in which rv32iss will also appear. Select and navigate to Debugger sub-tab, and uncheck Stop on startup at: main.
Now we have created a Run configuration for the model, this needs to be combined with the example_c debug configuration, previously detailed, within a Launch Group. Select Run->Run Configurations. and create a new Launch Group which we can also name example_c. In the Launches sub-tab click the Add. button. In the pop-up window, select a Launch mode of run, and from the C/C++ Applications select rv32iss, and then change the Post launch action to be a Delay of 1 second. OK this configurations, and then repeat an Add., but this time adding example_c Default from the C/C++ Remote Application. This needs a Launch mode of Debug, and a Post launch action of None. The resultant window should look something like the following:
This new Launch Group can be run just like for the Debug configuration, but now it will run first the rv32iss configuration which will start the model and then, after a second delay, run the debug session. Consoles are created for the configurations, and one will appear for the model for general I/O.
References[1]
The RISC-V Instruction Set Manual, Volume I:
User-Level ISA, Document Version 20191213, Editors
Andrew Waterman and Krste Asanović, RISC-V
Foundation, December 2019. [2]
The RISC-V Instruction Set Manual, Volume II:
Privileged Architecture, Document Version 20190608-Priv-MSU-Ratified, Editors Andrew Waterman and Krste Asanović, RISC-V Foundation, June 2019 [3]
Reference Manual for the LatticeMico32 soft CPU Instruction Set Simulator,
https://github.com/wyvernSemi/mico32/blob/master/doc/README.pdf,
Simon Southwell, August 2016 [4]
PCIe Virtual Host Model Test Component, https://github.com/wyvernSemi/pcievhost/blob/master/doc/pcieVHost.pdf,
Simon Southwell, March 2017. [5]
Berkley SoftFloat Library, release 3e, https://github.com/ucb-bar/berkeley-softfloat-3,
John R. Hauser, January 2018 [6]
Virtual Processor (VProc), https://github.com/wyvernSemi/vproc
, Simon Southwell, June 2010 [7]
Reference Manual for the Verilog Memory Model
Simulation Component, https://github.com/wyvernSemi/mem_model
, Simon Southwell, August 2021 [8] Debugging with GDB, 10th Edition, Stallman et. al., Free Software Foundation, 2012
DownloadThe source code is availabe for download on github. As well as the source code, files are provided to support compilation for Visual Studio and Eclipse. Also scripts to compile and run the riscv-tests suite are bundled in the repository.
|


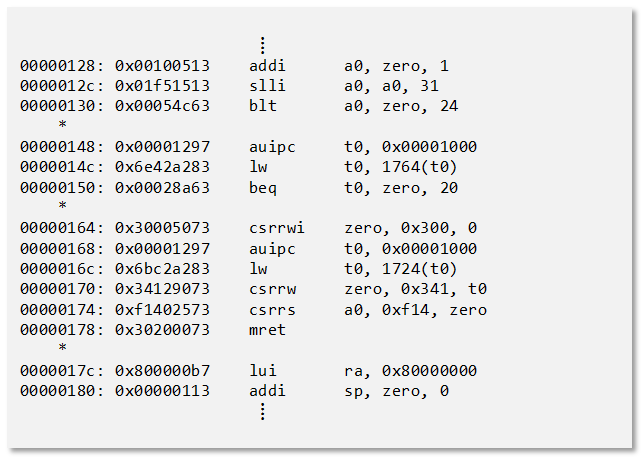

![void rv32i_cpu::beq(const p_rv32i_decode_t d)
{
RV32I_DISASSEM_B_TYPE(d->instr, d->entry.instr_name, d->rs1, d->rs2, d->imm_b);
if (!disassemble && state.hart[curr_hart].x[d->rs1] ==
state.hart[curr_hart].x[d->rs2])
{
state.hart[curr_hart].pc += d->imm_b;
RV32I_DISASSEM_PC_JUMP;
}
else
{
increment_pc();
}
}](rv32_manual_files/image006.png)
![void rv32i_cpu::xorr(const p_rv32i_decode_t d)
{
RV32I_DISASSEM_R_TYPE(d->instr, d->entry.instr_name, d->rd, d->rs1, d->rs2);
if (d->rd)
{
state.hart[curr_hart].x[d->rd] = state.hart[curr_hart].x[d->rs1] ^
state.hart[curr_hart].x[d->rs2];
}
increment_pc();
}](rv32_manual_files/image007.png)

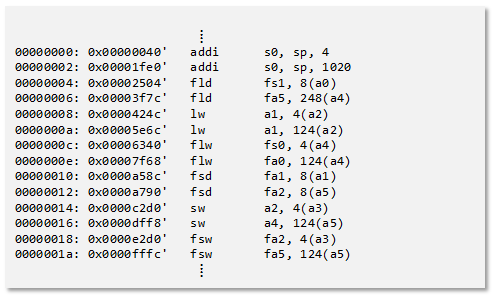
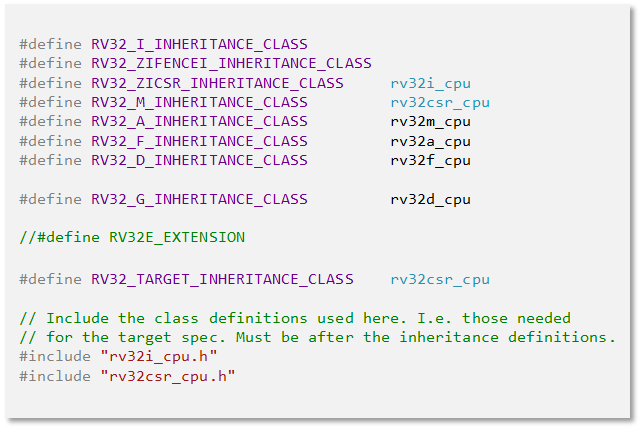
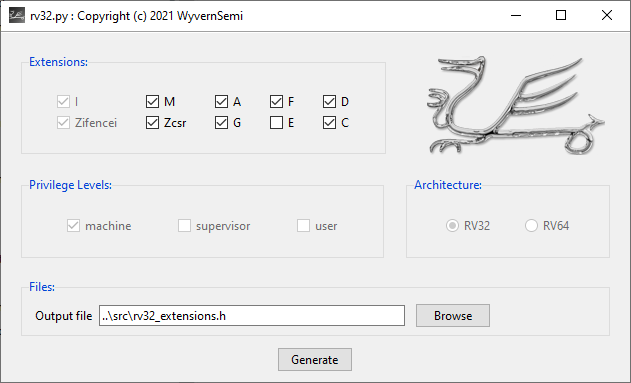
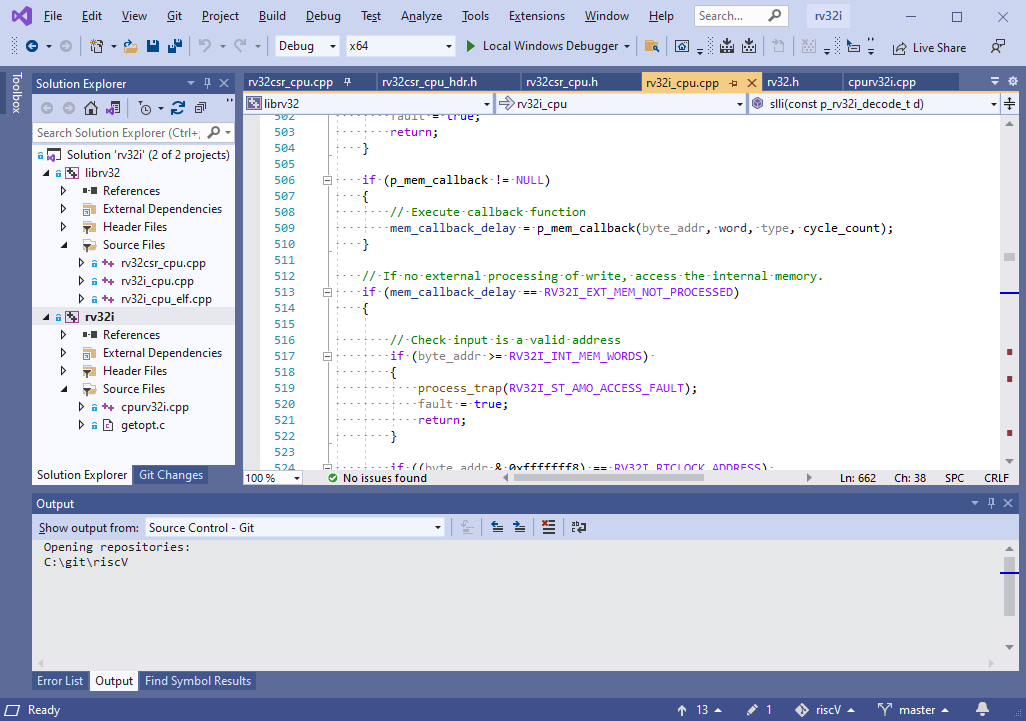
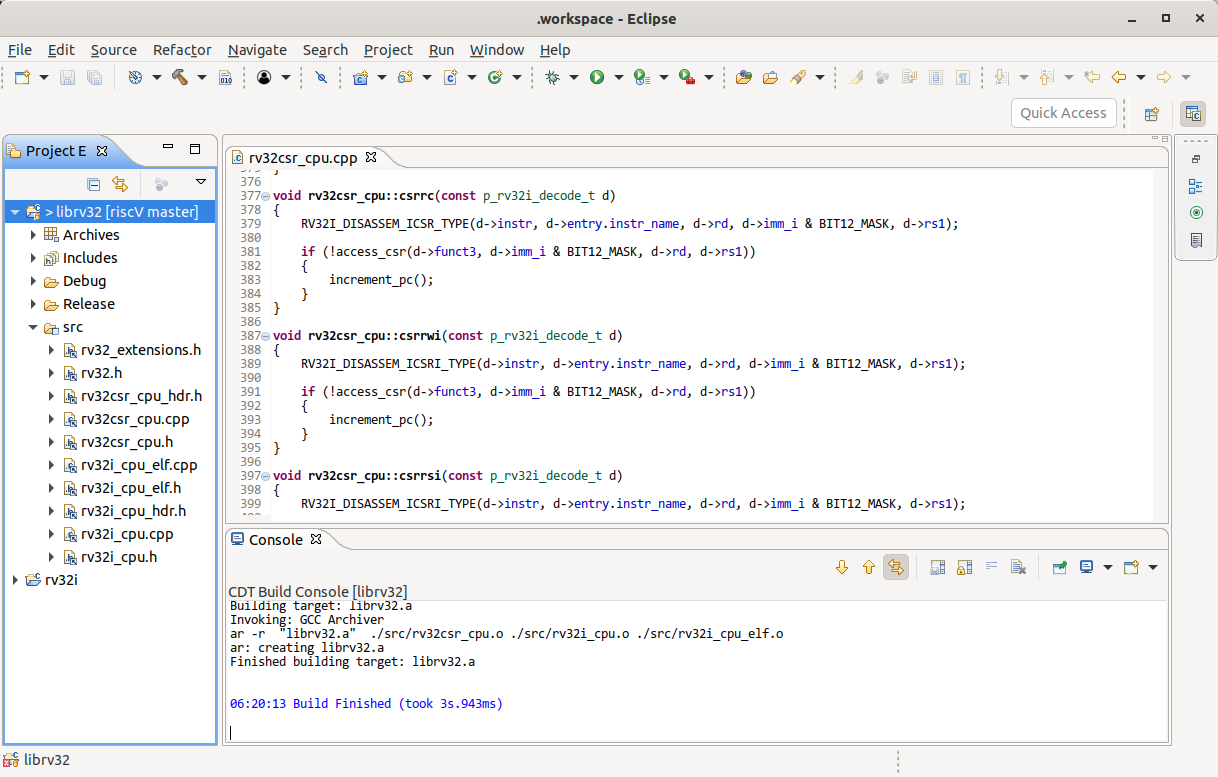
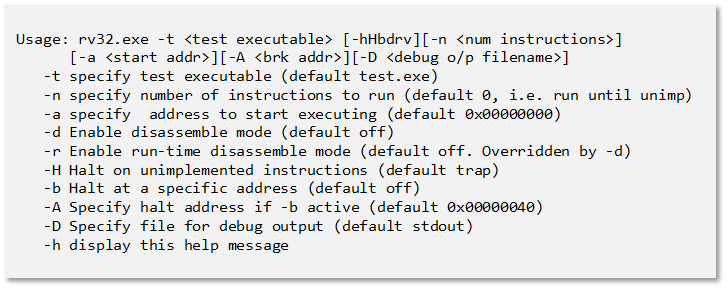

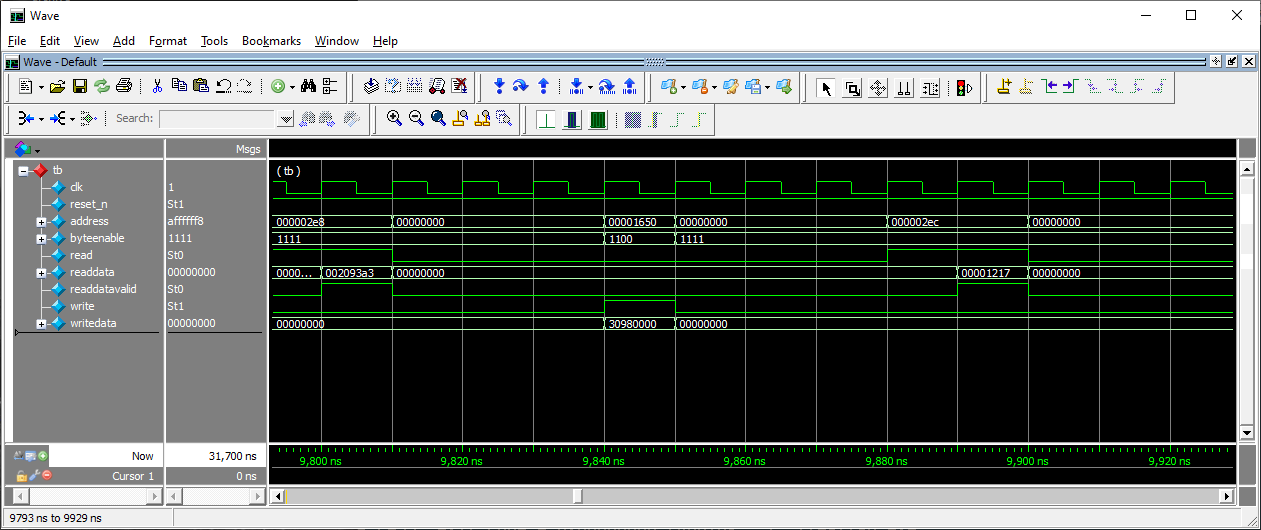
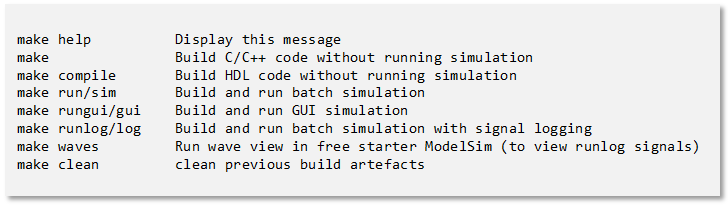

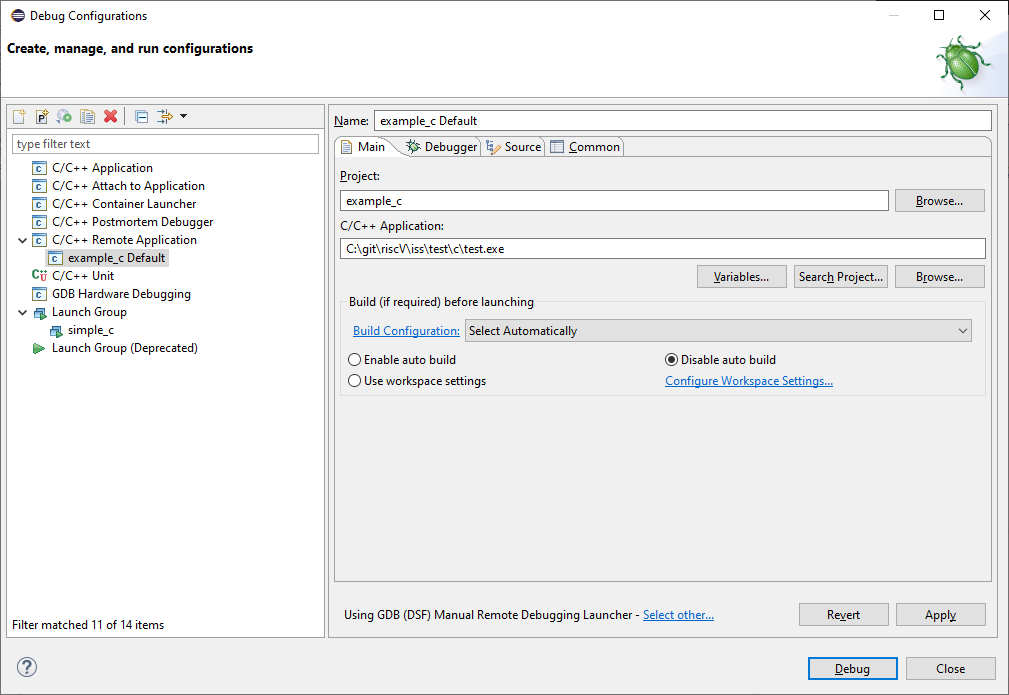
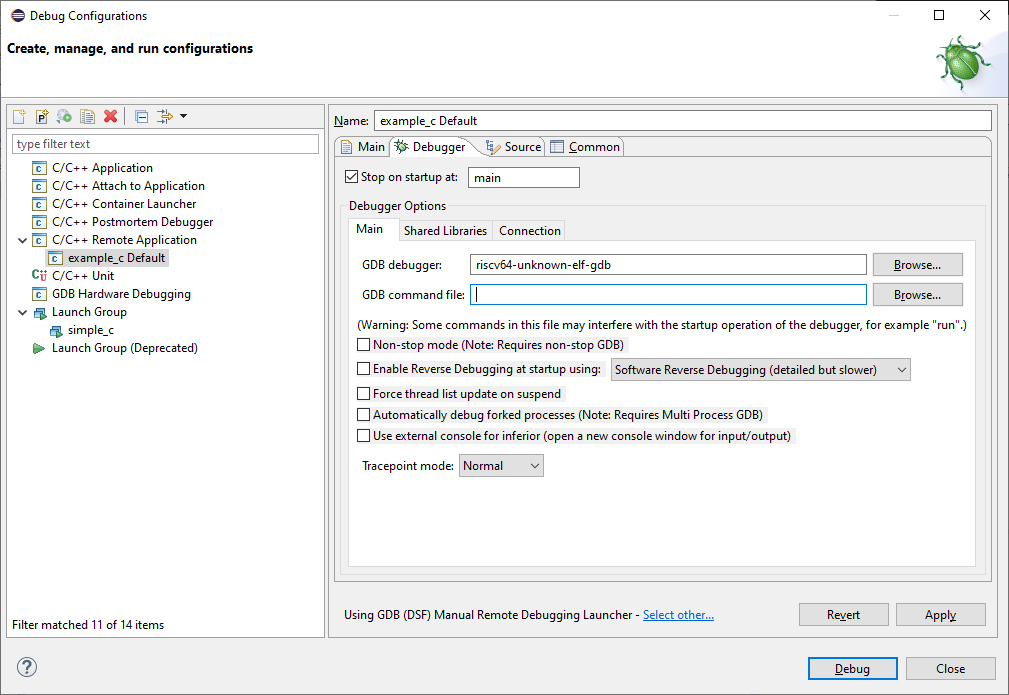
| Copyright © 2021 Wyvern Semiconductors. All rights reserved. |